Blueberry Crisp

Blueberry Crisp

Happy Easter, guys! Sorry for the hiatus, I’m alive I promise. It’s funny how life takes over sometimes.

My last post was in November 2013!  Back then, I was working at a tech start up in Chicago.  I was wide-eyed and excited to be in a new city, and quickly fell in over my head with things to do, so blogging took a bit of a backseat.  For the past 10 months, I have been exploring the Windy City’s food scene (seriously, I was going a little overboard and sometimes trying 2-3 new restaurants a week), taking dance classes and making new friends.  Chicago is a wonderful place with tons to do- I am especially going to miss the summer street fests and beaches.

Now, a lot has changed, and I’m back in my hometown in Michigan.  I’m starting a new job (tomorrow morning actually) in client services for a larger tech company, and I couldn’t be more excited about it.  I’m living with my family again, and have been spending some quality time getting re-acclimated with my childhood home.  It’s an adjustment from the hustle and bustle of the city, but one big perk is that I get to spend a lot more time with my family and focus more on PITK.

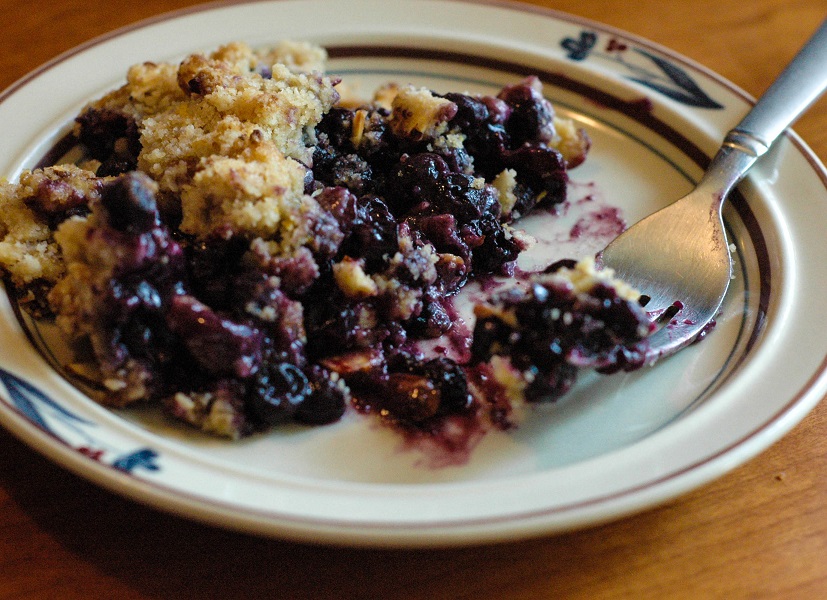
The food is better in my childhood home, too.  It helps when there are multiple cooks :). This blueberry crisp is from my family’s Easter dinner tonight, and it’s been a favorite in my house for years now. My mom started making this because it doesn’t use too much sugar and it is lighter than a pie. It was originally made with butter instead of coconut oil, but it was easily adapted into a vegan treat.

Dessert doesn’t get easier than this, people!

Blueberry Crisp 2


Blueberry Crisp
Makes 1 9-inch round crisp

3 pints (6 cups) blueberries (thawed and drained, if frozen)
1 tablespoon white sugar
1/2 teaspoon cinnamon
1 1/4 cup flour (I used white, can switch up to make GF)
1/2 cup packed light brown sugar
1 tablespoon lemon zest (from 1 lemon)
4 tablespoons coconut oil, solid
1/3 cup sliced almonds (can sub oatmeal here for similar texture)
2 tablespoons fresh lemon juice

Preheat over to 375F. Grease a 9-inch round deep-dish pie pan and set aside.

Toss blueberries with the white sugar, cinnamon and 1/4 cup of the flour. Spoon into pie pan. Combine the remaining 1 cup of flour, brown sugar and lemon zest in a large bowl. Add coconut oil and use a pastry cutter to cut into the pastry mixture until it becomes crumbly. Stir in the almonds and lemon juice. Sprinkle the topping evenly over the berries.

Bake for about 45 minutes, or until the blueberries bubble and the top is a golden brown color. Cool for 30 minutes, and serve warm with vanilla ice cream.

Reese’s Coconut Oil Cookies

Image

Last weekend, my friends from home came to visit me in Chicago.  We had a blast. Every day of their trip, we roamed around the city all day doing touristy things– we saw the Bean, the Signature Lounge, went shopping on Michigan Ave, tried great neighborhood restaurants etc (in particular, we ate at Crisp in Lakeview– best Korean fried chicken I’ve ever had.  Has anyone else been?).  And then we went out at night too, taking full advantage of the ones that stay open until 4 am. By the time they left on Sunday, I was so exhausted that I lied on the couch all day and watched movies by myself.

Then, of course, I got sick.  I could barely wake up for work on Monday.  When I made it to the office, it took two whole cups of coffee to get my brain to work.  I got through the day alright, but Tuesday killed me and I ended up leaving halfway through to buy medicine and work from the comfort of my couch.  I was back at work on Thursday, but I clearly still needed to relax and rest up from the weekend before, making this weekend a relaxed one with lots of baking and no bars.

My boyfriend, Mike, and I, watched a football game with another friend on Saturday, and rather than drinking and going to the bar, we decided to make it into a feast.  We picked up Thai food on the way to our friend’s house, and baked the whole morning before the game.  Mike made rice krispy treats (he is the rice krispy expert), and I made these babies.

I think I’ll be using coconut oil in all of my cookies from now on… I discovered recently that when at room temperature, coconut oil can be creamed with sugar just like butter!  So while the cookies may spread a little wider, achieving a chewy, fluffy cookie is totally possible.

 The chunks of Reese’s is really what sends these cookies over the edge.  I recommend refrigerating or even freezing the chopped candy beforehand so it doesn’t crumble into little pieces when you stir it into the batter, and do not even THINK about replacing them with Reese’s Pieces.  Those are not as good.  You’ve been warned.

But do bake these ASAP.  Mike told me that they might be the best cookie I’ve made
yet!

Reese’s Coconut Oil Cookies

Makes 2-3 dozen cookies, depending on size

2 cups flour
1 teaspoon baking soda
1 teaspoon salt
3/4 cup coconut oil, room temperature
1 cup packed brown sugar
1/2 cup white sugar
1 teaspoon vanilla
2 eggs
16 Reese’s Peanut Butter cups, chopped and refrigerated or frozen

Whisk dry ingredients together and set aside. In a large bowl, cream solid coconut oil with sugars, beating until light and fluffy. Add vanilla and eggs and beat until smooth. Slowly combine flour, baking soda and salt, mixing until just combined. Do not overmix! Take refrigerated/frozen Reese’s and stir in gently. Form dough into 1.5-2″ balls and place on cookie sheet.  Refrigerator for 30 minutes to overnight.  (You must form the balls of dough first, after refrigerated the coconut oil will get very hard and will not be as malleable!)

When ready to bake, preheat oven to 350F. When at the correct temperature, place cookie sheet in oven and bake for 9-12 minutes, or until the edges of the cookies are slightly browned and the centers are soft.  Enjoy!

Coconut Oil Reeses Cookies_

White Chocolate Cherry Cookies + settling in

Image

Eek it’s been 3 months since I’ve been on here!  My transition into real-personhood has been pretty smooth, but blogging definitely takes a backseat to busy work life.  Since I usually take pics of my food in natural light, it’s been difficult to catch you know, “good sun” around a 9-5 work schedule (and more obviously, finding time to even cook/bake).

Since my guacamole post, I’ve moved to a new apartment in a different neighborhood of Chicago and I’ve been working a real job for almost 6 months now.  FINALLY, I’m starting to feel a little more relaxed , but stress from the past few months left me feeling like a chicken running around without its head.  I don’t really know how to describe what I’ve been doing since I’ve moved, but I can say it’s all been a humbling experience! I’ve been learning about super fun stuff like building credit, finding a dentist and making new friends.  (All of these things are still in progress…).

Anyway, I found this recipe on Sally’s Baking Addiction a while ago and have been dying to make them.  (As another side note, another thing that is different in Chicago is that everyone I meet seems to be watching their weight and won’t eat sweets! Meaning, my roommate, my co-workers, my friends…. One more reason I haven’t been baking so much is that there is no one around to eat my treats).  I’m a little bummed that they turned out to be so ugly compared to Sally’s pictures, but they are sweet and soft, just like she promised.  Now… just have to find someone to give them away to before I eat the whole batch…

White Chocolate Cherry Cookies
Yields 2-3 dozen cookies, depending on size

3/4 cup (1.5 sticks) unsalted butter, softened to room temperature
3/4 cup dark brown sugar
1/4 cup granulated sugar
1 large egg, at room temperature
2 teaspoons vanilla extract
2 cups all-purpose flour
2 teaspoons cornstarch
1 teaspoon baking soda
1/2 teaspoon salt
3/4 cup white chocolate chips
3/4 cup dried cranberries (I used dried cherries)

Line cookie sheets with parchment paper, but do not preheat oven yet (dough requires chilling).

Mix dry ingredients in a medium-sized bowl and set aside.  Cream butter and sugars together until fluffy and pale in color.  Add egg and vanilla and beat until combined.  With the mixer running on low, slowly add in dry ingredients.  Dough should become stiff, but not crumbly.   Do not overmix.  Stir in white chocolate chips and dried fruit (I opted for cherries, I’m sure dried blueberries would work well too).

Make one big ball of dough and cover with saran wrap.  Refrigerate for a minimum of 30 minutes, or as long as 3 days.  Chilling the dough allows the flavors to deepen, aka makes better tasting cookies, so if you have the time, be patient! 🙂

Easy Guacamole + the two key ingredients

Guacamole 1

Last time I made this recipe,  I realized I had about four cups of guacamole to eat before it spoiled… so I offered some to my roommate.  She is great about sharing things with me, so I told her something along the lines of  “I made some fresh guacamole, I have soooo much and there is no way I can finish it by myself, help yourself to as much as you want!” Friendly, right?

Well, my boyfriend happened to be over at that  same time and was listening to the whole exchange. He told me later (with this horribly righteous smirk on his face, of course) that all he could think while I was talking to my roommate was that he has SEEN me eat guacamole and knows for fact that I could finish it by myself just fine. I think he might have used the phrase “you can put it DOWN.”  Hmph.

Slightly embarrassing, yes… but my boyfriend is right and ever since he made that comment I have been noticing that whenever I make guacamole, I find a way to put it on EVERYTHING.  I love the stuff.  I incorporated it into my breakfasts recently by making egg, turkey and guacamole sandwiches on Morning Rounds (Costco, anyone?).  Chips and guac is an obvious one, but I put it on salads, dip vegetables in it… eat it with a spoon… everything!

I didn’t make this recipe from scratch, I sort of combined recipes from Ina Garten and Alton Brown by just taking the parts I like from each.  Cumin, which is one of two secrets of great guacamole, comes from Alton, and fresh lemon juice, which is the other secret, comes from Ina.  Once you make this you will forever be unimpressed with the guac you get at restaurants, enjoy!

Guacamole 2

Easy Guacamole (I am literally writing the recipe from memory because I make it so often)

4-5 ripe, but not mushy avocados
1-2 roma tomatoes (depends on size, your preference), diced
1/2 red onion, diced
1 large clove garlic, minced (I always add more)
1/2 cup cilantro, roughly chopped (optional, adds a nice touch)
3 tablespoons fresh lemon juice (don’t even think about using the bottled stuff!)
1 teaspoon salt
1 teaspoon pepper
1 teaspoon ground cumin

Combine ingredients in a bowl and stir! Easy, right? Guacamole usually tastes best after the flavors have had time to deepen, so try and let this one sit for at least 30 minutes before serving (but don’t worry, I usually can’t wait that long, it tastes great even without sitting too!)

Cilantro-Peanut Pesto

Pasta with Cilantro Sauce 3

Isn’t cilantro the best?  I’m a total cilantro fiend. The $0.69 per bunch herb has some crazy health benefits, and it also adds a delightful little kick of flavor to everything from tacos to guacamole to pasta to chili. I recently even tried it in sushi (drool…)!  To my surprise, I read an article a while ago that said some people actually have a gene that makes cilantro taste plastic-y to them.  As in, they don’t like it because it tastes like chemicals– or something along those lines.  Crazy, right?

This recipe definitely isn’t for those people (I am not entirely sure they exist though, I’ll have to meet one to believe it).  You can ignore this post if you don’t care for the magical little parsley-imposter… but for everyone else who loves cilantro like me, you should try this one ASAP!  Today, I consider this to be one of my staple recipes, and while these pictures show my meal with pasta and broiled steak, I think grilled chicken or shrimp would pair nicely with this sauce as well.

Cilantro-Peanut Pesto

1 bunch cilantro, roughly chopped (about 1 cup)
1 clove garlic, smashed, peeled, and roughly chopped
1 tablespoon minced fresh ginger
2 tablespoons vegetable oil
1 tablespoon sesame oil
1/4-1/2 teaspoon red pepper flakes
1 1/2 teaspoons brown sugar
zest and juice from one lime (about 2 tsp zest and 2 Tbs juice)
1/4 cup roasted peanuts (plus more for serving, if desired)
2-3 tablespoons low sodium soy sauce

In a food processor, combine everything except for the soy sauce.  Pulse until a coarse paste forms.  Season with soy sauce and pulse to combine.  In a large bowl, toss pesto with hot pasta (though, if you are serving later, I would wait to mix the pasta and pesto until right before your meal. This results in a more intense flavor!).  Roughly chop additional peanuts and sprinkle over pasta along with extra cilantro leaves and lime wedges if desired.  Serve immediately.

From Our Best Bites

(^^^Our Best Bites is one of my favorite food blogs!)


Pasta with Cilantro Sauce 2

Cheesecake-Swirled Brownies

Cheesecake Brownies 3

Hai. Here is an update on my life.  I graduated from undergrad two weeks ago! I am so relieved to be done.  The constant worry of completing problem sets and writing essays on the weekends was starting to wear me down once the weather started to get nice this year.  Senioritis, anyone?

I found a job about two weeks before graduation, and since then I’ve been cruising through life and enjoying my lazy days before I have to move and begin my big girl job!  Today, for example, I woke up at noon, took pictures of these delightful little brownies, and watched TV with my housemate for three hours.  And I’m not even bored yet!  (I swear I never do this… do I need to make excuses though? Nah.)

I’ll be moving to Chicago in a few weeks to start a new chapter of my life.  I can’t wait. Who knows what sort of new recipe ideas will find me there :).

Anyway, if you are looking for a spiced-up version of your usual brownie recipe, try out these cheesecake-swirled brownies! They are sweet, chocolate-y and surprisingly easy to make.  Yummmm….

Cheesecake Brownies
Makes 16 brownies

Brownie batter-
1/2 cup unsalted butter, cut into pieces
4 oz unsweetened chocolate, chopped
1 cup sugar
2 large eggs
1/2 teaspoon pure vanilla extract
2/3 cup all-purpose flour

Cheesecake batter
1 block cream cheese (12 oz)
1/3 cup sugar
1 large egg yolk
1/4 teaspoon pure vanilla extract

Plus
1/2 cup semisweet chocolate chips

Make brownie batter:
Put oven rack in middle position and preheat oven to 350F. Grease an 8×8 baking pan. Heat butter and chocolate in a saucepan over moderately low heat, whisking occasionally, just until melted. Remove from heat and whisk in sugar, eggs, vanilla, and a pinch of salt until well combined. Whisk in flour until just combined and spread in baking pan.

Make cheesecake batter: 
Using an electric together cheesecake batter ingredients in a small bowl until smooth. Dollop over brownie batter, then swirl in with a butter knife or spatula.

If using chocolate chips, sprinkle over the top of the cheesecake marbled brownie batter. Don’t use too much, or this will take away from the pretty swirl effect!

Bake for 35 minutes, or until edges are puffy and center is set. Serve warm or at room temperature, maybe even with scoop of vanilla ice cream :).

Recipe slightly adapted from Smitten Kitchen

Banana Nutella Muffins

Banana Nutella Muffins 2


Life has been busy lately!  I am wrapping up my last semester of undergrad and have been up to my eyeballs with tests and papers.  I have one more day of class, then finals, and then graduation! I’m SO EXCITED (and pretty scared).

I finally had a free day (and some grossly brown bananas to get rid of) so I whipped up these babies.  My best friend said that these might be one of her favorite recipes. Banana bread+Nutella… I mean, how do can you go wrong? 


Banana Nutella Muffins

2 cups all-purpose flour
1 teaspoon baking powder
1 teaspoon baking soda
1/2 teaspoon salt
4 over-ripe bananas, mashed
1/2 cup granulated sugar
1/2 cup packed brown sugar
1 egg
1/4 cup canola oil
2 teaspoons pure vanilla extract
Nutella

Preheat oven to 350F. Prepare a muffin tin with liners and set aside. Combine the flour, baking powder, baking soda and salt in a medium sized bowl. Whisk to combine ingredients well.

In a separate bowl, combine the mashed banana, sugar, brown sugar, egg, canola oil and vanilla extract. Slowly pour the dry ingredients into the wet ingredients whisking until there are no lumps. Do not over mix (batter will be very thick at this point).

Use a spoon to fill muffin tins 3/4 full. Top each muffin with a teaspoon of Nutella. Using a toothpick, swirl the Nutella into the muffin batter. Bake muffins for 17 minutes, or until a toothpick inserted in the middle comes out clean and/or with dry crumbs.

Recipe from The Novice Chef

Banana Nutella Muffins 3


Banana Nutella Muffins 1

Almond Poppy Seed Quick Bread

Quick breads are the best. You can throw all the ingredients together in one or two bowls, pour everything into a pan and leave it in the oven for an hour.  There is no annoying whipping of egg whites, chopping of fruit, boiling of sugar or spooning batter into little cups. So easy! And this recipe makes TWO loaves. So more for sharing. Nom.

Almond Poppy Seed Bread 2

I was really excited about this recipe because the only way I’ve ever eaten poppy seeds is in lemon poppy seed muffins. After this recipe, almond is my new favorite flavor.  Everyone who has tried it has had the same reaction: “OMG. Yum. Can I have another slice?”  I made this bread yesterday and one of the loaves is already gone… so if you are in a pinch and really want to impress your family with treat for Easter, make this!

Almond Poppy Seed Bread 4

Almond Poppy Seed Bread
Makes two 9×5″ loaves

Bread:
3 cups flour
1 1/2 teaspoons salt
1 1/2 teaspoons baking powder
2 cups sugar
1/3 cup poppy seeds
1 1/3 cup canola oil
3 room temperature eggs
1 1/2 cups milk (I used almond milk, your favorite should be fine)
1 1/2 teaspoons vanilla extract
1 1/2 teaspoons almond extract

Glaze:
1/4 cup orange juice
2 tablespoons lemon juice
2 cups confectioners’ sugar

Preheat the oven to 350F. Spray two 9×5-inch loaf pans with cooking spray. In a large mixing bowl, whisk  flour, salt, baking powder, sugar, and poppy seeds. Set aside.

In another large mixing bowl, whisk the oil, eggs, milk, and extracts until combined.

Using a wooden spoon, make a well in the center of the dry ingredients. Pour the wet mixture into the well and use the spoon or a rubber spatula to combine the ingredients. Divide the batter evenly among the prepared pans. Bake for 1 hour, or until a toothpick inserted into the center of a loaf comes out clean. (Here, if your edges appear to be browning too quickly, top with aluminum foil midway through baking)

When the breads are finished in the oven, make the glaze: In a large bowl, whisk together the confectioners’ sugar and both juices until smooth and runny. Add the liquid slowly so the glaze doesn’t become too runny.

Run a butter knife along the edges of each pan, then invert the pans and remove the still-warm loaves. Place the loaves, right side up, onto serving plates and drizzle each one with the glaze. Cool completely before slicing.

Recipe adapted from AllRecipes

Almond Poppy Seed Bread 1

Coconut Milk Brownies

Coconut Milk Brownies 2

It was the name of these brownies is what caught my eye. Coconut milk? My lactose intolerant dream ingredient.  It’s the rich, decadent, magical little fix that makes everything creamy again!  As it turned out, these still contain two entire sticks of butter in addition to the coconut milk, but there’s nothing a Lactaid pill can’t fix, right? Right (hopefully). So I tried them.

These babies really do pack in the calories– coconut milk, butter, and entire bag of semi-sweet chocolate chips? But more calories can only mean one thing, MORE FLAVOR! Once again, my housemates approve, and I am happy to present to you, another dense, fudgy, and delicious brownie recipe.

Coconut Milk Brownies 1
Coconut Milk Brownies
Makes on 9×13″ pan

1/2 cup (1 stick) butter
2 cups sugar
2 cups semi-sweet chocolate chips
1 cup coconut milk
2 large eggs
1 tsp vanilla extract
1 1/4 cups cocoa powder
1 teaspoon salt
1 teaspoon baking powder
1 1/2 cups all-purpose flour

Frosting
1/2 cup butter, softened
1 tsp vanilla
1/3 cup coconut milk
1/3 cup cocoa powder
2-2 1/2 cups powdered sugar

Preheat the oven to 350 degrees. Butter a 9×13 baking dish.  In small saucepan over low heat, melt butter completely. Stir in sugar and continue cooking for 1-2 minutes, stirring constantly. Do not allow sugar mixture to boil. Add the chocolate chips and stir until melted.

Pour butter mixture into a large bowl or stand mixer and beat in coconut milk, eggs, and vanilla extract. In a separate bowl, combine the cocoa powder, salt, baking powder, and flour. Gradually add to the wet mixture and mix until well combined. Pour into prepared pan. Bake for about 35-45 minutes, until a tester comes out mostly clean. Let cool on a wire rack until completely cool.

While the brownies are baking, make the frosting by whipping the butter until lighter in color. Add the vanilla and coconut milk and beat until combined. Slowly add the cocoa powder and mix until combined. Add the powdered sugar 1/2 cup at a time until frosting has reached desired consistency. Spread over brownies once completely cooled.

Recipe from A Duck’s Oven

Coconut Oil White Chocolate Chip Cookies

Coconut Oil Cookies 1

My god, Averie is good.  Coconut oil instead of butter? Why didn’t I think of that? My lactose-intolerant self leaped for joy when I found these  butter-less cookies.  After trying this recipe from Averie Cooks, I’m pretty sure I’ll be making a trip to Costco to get one of those gallon-sized tubs of coconut oil…

These are best eaten straight from the oven– they’re chewy, gooey and really sweet, just how I like my cookies!  I had a little bit of trouble with the dough— it was super dry and crumbly so next time I think I will reduce the flour and increase the oil a bit.  Just a tip!

Coconut Oil White Chocolate Chip Cookies
Makes 15 cookies

1/2 cup coconut oil, softened (softened to the consistency of soft butter; not rock hard and not runny or melted)
1/2 cup granulated sugar
1/2 cup light brown sugar, packed
1 large egg
1 1/2 teaspoons vanilla extract
1 cup all-purpose flour
3/4 cup bread flour (I subbed all purpose flour here)
1 teaspoon baking soda
1/4 teaspoon salt
1 cup (6 ounces) white chocolate chips

To the bowl of a stand mixer fitted with the paddle attachment, combine coconut oil, egg, sugars, vanilla, and beat on medium-high speed to cream until light and fluffy, 4 to 5 minutes. Note – Coconut oil should be the consistency of soft butter like you’d use to cream with sugar and eggs in traditional cookies. If coconut oil is rock hard, microwave it in a small bowl for 5 to 10 seconds or just until it begins to soften. If coconut oil is runny or melted, place it in the freezer momentarily until it firms up. A tiny amount of runniness is fine; it’s an oil and that happens. But do not use melted or purely liquid coconut oil because you can’t effectively cream a liquid; it would be like trying to cream liquid butter.

Stop, scrape down the sides of the bowl, and add the flours, baking soda, salt, and mix until just combined, about 1 minute. Add the white chocolate and beat momentarily to incorporate or fold in by hand.

Divide dough into approximately 15 equal-sized pieces. Place dough mounds on a large plate, and slightly flatten each mound. Very important to get the dough mounds in the exact shape you want to bake them in because after chilling, flattening or re-shaping them is very difficult. Cover with plastic wrap, and refrigerate for at least 2 hours; up to 5 days. Do not bake these cookies with dough that has not been properly chilled because they will spread.

Preheat oven to 350°F, line or grease a baking sheet. Place dough on baking sheet, spaced at least 2 inches apart; I bake a maximum of 8 per sheet. Bake for 9 to 11 minutes, or until tops have just set, even if slightly undercooked and glossy in the center. They firm up as they cool and I recommend the lower end of the baking range because they taste best when softer and paler. Allow cookies to cool on the baking sheet for 5 to 10 minutes before moving. Store cookies in an airtight container at room temperature for up to 5 days, or in the freezer for up to 3 months. Alternatively, unbaked dough can be stored in an airtight container in the refrigerator for up to 5 days, or in the freezer for up to 3 months, so consider baking only as many cookies as desired and save the remaining dough to be baked in the future when desired.

Recipe from Averie Cooks

Fresh Strawberry Chocolate Chip Muffins with Orange Glaze

Strawberry Chocolate Chip Muffins 1

Yay, muffins!

Strawberry Chocolate Chip Muffins 2

Fresh Strawberry Chocolate Chip Muffins with Orange Glaze
Makes 12 large muffins

Muffins:
1/2 cup butter or margarine (I used Earth Balance)
1 cup milk (I used almond milk)
1 1/2 teaspoon vanilla
1/2 teaspoon almond extract
2 eggs
2 1/4 cups all-purpose flour plus 1 tablespoon
3/4 cup sugar
4 teaspoons baking powder
1/2 teaspoon salt
1 cup strawberries, chopped
1 cup chocolate chips

Glaze:
1 tablespoon orange zest
1 cup freshly squeezed orange juice
1/2 tablespoon lemon juice
2-2 1/2 cups powdered sugar

Preheat oven to 400º. Line 12 cup muffin tin with paper liners or spray with non-stick cooking spray. In a small bowl, toss chopped strawberries with one tablespoon of flour, set aside. In small bowl, whisk together butter, milk, vanilla, almond extract and eggs, set aside. In large bowl, whisk together flour, sugar, baking powder and salt. Make a well in center of dry ingredients. Add wet ingredients and stir just until combined (do not over mix). Gently fold in strawberries and chocolate chips. Divide batter over 12 muffins (cups will be quite full).

Bake for 18-20 minutes or until lightly golden and a toothpick inserted in the center comes out clean. Let stand for 5 minutes before removing from pan to cool on a cooling rack.

To make the glaze, whisk ingredients together until thick and smooth. Dip tops of completed cooled muffins into glaze or pour over the top. Allow to dry before eating, then enjoy!

Recipe adapted from Hidden Ponies

Strawberry Chocolate Chip Muffins 3